This post is in response to general questions people had about my
personal approach to drawing and inking in Flash. I've mentioned that I'll be doing animation-focused tips soon, but I thought it would be a good time to address those questions and any new questions people might have as they've started drawing in Flash.
A number of you were curious about how I achieve my line quality in Flash. It's a hard thing to describe, but I will do my best. I should start by saying that I hadn't mastered inking with a real brush (still haven't) before I began drawing in Flash. And in many ways, inking with the
Brush tool in Flash has turned me on to becoming skilled with a traditional brush. Most cartoonists will tell you that it takes years to become fully adept and confident with a brush—the learning curve in Flash is hopefully a bit shorter. It takes a couple months to get past the initial frustration (if you started back when I did my January post I hope you're well on your way). Like any tool, you have to learn all of its quirks and subtleties. Each version of Flash is different, not to mention all the settings you can choose. You might even find it feels different if you hop to another computer. I know I prefer my setup at home to my setup at work. So many things come into play—whatever they are, you'll eventually get used to them.
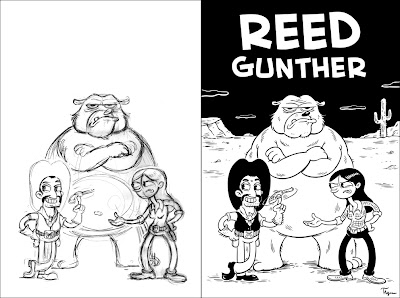
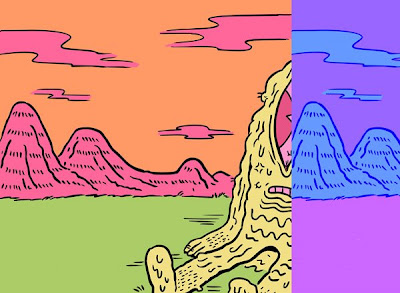
Drawing in Flash actually changed my line style a bit, as I've switched from mainly using a single-width pen line to a varying-width brush line. Here are two doodles before and after drawing in Flash:
(be sure to click on all images for larger versions)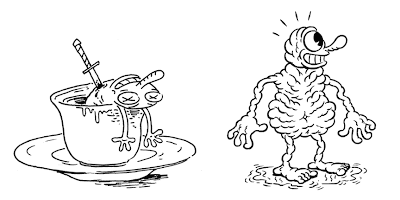
I immediately found I could create something akin to the brushy cartoon line I love so much. Which is something I would have discovered if I'd picked up a real brush to begin with, but Flash offers a certain amount of control—not to mention the Undo button so you can get your stroke just right. I still think of it as cheating in some ways because it's so easy once you get the hang of it.
Line StylesMost people I know have been able to transfer their natural drawing style into Flash once they get comfortable. If you're the kind of person that wants to create lines with perfect precision, Flash will let you do it and the manual
Smoothing tool will help you get there. If you use a rough scratchy line, you should be able to achieve that in Flash, too. If you like something in-between, perhaps a wobbly line that skips along the page, you'll figure that out in no time. If you don't want any varied weight, just use the
Pencil tool. Most line-styles are do-able in Flash.
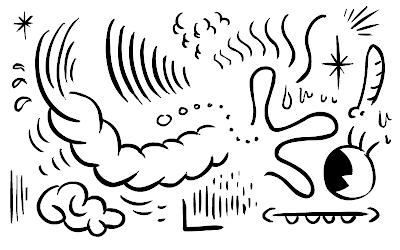
Whatever your line-style, practice it in all it's various iterations. Here I just opened up a file and started making lines of all types and shapes.
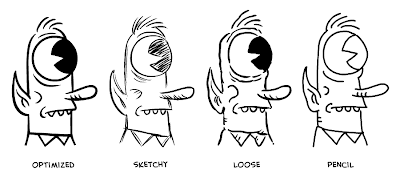
 To Smooth or Not to Smooth
One of the things that either concerns you in Flash or doesn't is how perfect you want your line to look on the closest possible inspection. This is often called "optimization" —technically, how many points make up your vector shape, how smooth it is, and if it has any bumps along the way. The most common style in Flash animation is a perfectly optimized line, which you rarely get when you put down a stroke with your pen and tablet. This is where the tendency arises to tweak and retweak your line until you get a geometrically perfect curve free of imperfections. I would argue this is what frustrates people new to the program who want it to look that way from the beginning.
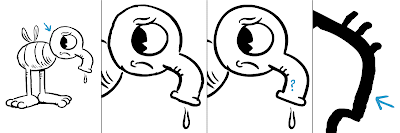
Here's a case where I drew a picture of Drip with Smoothing set to 30, meaning the vector edge is certain to have little jaggies. Still, at 100%, you don't really notice any imperfections—except on his head. So you zoom in and go to work, manually selecting and smoothing as described in
FlashTip#1. You smooth out most of the drawing. But wait, what's that on his nose? GAH! You get the point...you can keep smoothing to the
nth degree. But the first drawing looked pretty good. It's all up to you, and how much this kind of stuff annoys you if you don't go in and smooth it.
For whatever reason, I've been able to get around smoothing by laying down quick, confident strokes. I naturally get a pretty smooth looking line when I draw in Flash. But if I abuse anything, I overuse Undo. I rarely need to use the manual smoothing tool unless I want to iron out a blatant imperfection. I find over optimization tends to flatten the drawing and sterilize the life you put into it. But it's a look a lot of people seem to prefer. Just remember that if you ink a drawing on paper, scan it, and zoom in on it, you'll see all kinds of little bumps from where the ink seeped into the grain of the paper.
The beauty of Flash is that you can draw in vector and still have a line that looks hand drawn. All those little bumps and imperfections contribute to that handmade quality. So, if I could give any advice it would be to not obsess over vector perfection, let your line live, and have fun drawing.
A Few More Parting TipsInking versus DrawingInking and drawing are normally two different aspects of image-making for me. I would define drawing as building up forms in a gestural kind of way, whereas inking is deconstructing those forms into distinct line segments. Normally drawing comes first and then you ink, but in Flash it's tempting to do both at the same time. You'd probably be less apt to whip out a brush and start drawing with it on paper because ink is permanent. But on the computer, you can draw as if you're inking because Undo is there whenever you need it. If you're new to digital inking, this can feel amazing! You think
"Wow, look how fast I can draw! And it's already inked!" While it's fun to see your doodles look amazingly crisp, I still find it good practice to gesture something loose underneath if you're about to tackle something complicated. Or scan in a sketch.
 Keeping Your Line-weight Consistent
 Because of the "zooming-in" issue in Flash (your brush doesn't scale proportional to the zoom) you may find that your line-weight varies across your drawing. Try to stay at the same zoom level with the same brush size as you work (say, 200% with the largest brush size) when you're doing the majority of your inking. Zoom in for detail and change your brush size as you need to, but remember to go back to the default you set for yourself.
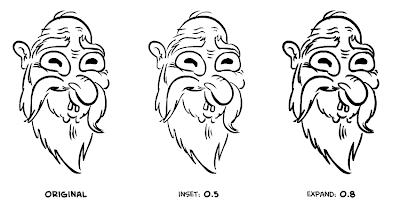
One trick I use when I notice one part of my drawing is thinner or thicker than another is to use the "Expand Fill" command under
Modify-->Shape. You only need to apply in decimal amounts (0.3 or 0.5). It will uniformly thicken or thin your line. Don't overuse it though, because it can completely glitch out your drawing. But it is a good weapon to have.
 Exporting Your Artwork
I mentioned it in
Flashtip#2, but it's good to address it again here. Especially because Flash isn't always the final destination of your artwork. If you want to retain the vector format and continue working in a program like Illustrator, the best way to export is as an
EPS. Because here's the bad news:
exporting as Illustrator completely cruds up all your color. Amazingly, they still haven't fixed this oddity. Worse still, they completely got rid of the EPS option in CS4! Which means you should keep an earlier version handy if you have it.
The best way to save out raster art (especially with transparencies) is the uncompressed
PNG format. This is my favorite way to bring artwork into Photoshop or any other pixel-based program (Painter, ArtRage). The bad news is that you can't export to layers (they really should add an export to PSD feature). You can however export one layer of your drawing at a time by turning every other layer to a
guide layer—repeating this step for each layer your want to export as PNG.
There is one more thing I will say about saving out as EPS. It is also a good workaround for a bug in Flash that limits how large you can export a raster image. The colors turn weird and start banding or repeating on the edges when you try to save out a really large image (like 6000 pixels wide). In this case, save out as EPS (vector) and then let Photoshop convert it to raster for you.
 The weird export glitchExporting Animation
Even though I haven't talked much about animation tips, this bubbled up in the comments of another post so I thought it fair to mention here. Quicktime is the recommended way to go in Flash versions 8 and earlier. Simply Export as Quicktime Video, choose your resolution (traditionally 720x480—which will squash the proportion for NTSC), bump up the quality and you're good to go.
Both CS3 and CS4 have an extremely buggy export engine which often mucks up your file with dropped frames and other oddities. I do not advise using the Export to Quicktime feature in these versions. We've been experimenting with exporting as a PNG Image Sequence. Which you can then load into a program like After Effects or Quicktime Pro to string them all into a movie file and add your audio track. That is the best way of ensuring every frame gets in there and plays without any hiccups.
And that's where I leave you. Animation prepping tips are to come. I encourage any comments or questions you might have. Have fun drawing and inking!
Read more in the FlashTips series:
FlashTip #1: Drawing with a BrushFlashTip #2: Approaches to ColoringFlashTips: Questions Anyone?


 I recently purchased one of those Pentel Pocket Brush Pens (if you're interested, check out Jet Pens), which unlike felt-tip brush pens (markers, really) has actual bristles. It's known in cartooning circles as one of the best brush pens around. When you first get it the bristles are completely white until you load the cartridge and the ink flows in. As long as you keep the cap on, it never dries out.


 This post is in response to general questions people had about my personal approach to drawing and inking in Flash. I've mentioned that I'll be doing animation-focused tips soon, but I thought it would be a good time to address those questions and any new questions people might have as they've started drawing in Flash.


